
To build real student engagement, Teachfloor combines a community builder, peer review, app integrations, and one feature that ties them all together: embed code.
One of our favorite features is the embed code. It is not a new invention, and you have seen it on most online tools. But for building courses, it changes what is possible. It lets instructors create an engaging learning environment by combining a flexible LMS with an almost unlimited set of tools to embed.
This flexibility is what makes Teachfloor a strong platform for building interactive courses. Because you can embed 100+ external tools, whiteboards, slides, quizzes, docs, and video, directly inside a lesson, a course becomes hands-on and interactive without learners ever leaving the platform.
In this guide, we will cover:
- what an embed code is
- the simple steps to embed content on Teachfloor
- effective methods for creating highly engaging online courses
- the tools that help you execute these teaching methods
- precise 'how-to' guidelines to embed each tool on Teachfloor
What is an embed code?
An embed code is simply an HTML snippet that lets you display content from one website inside another. Embedding content such as videos, presentations, quizzes, and surveys is a useful way to enrich your course creation.
Embedding a code is simple. It does not require technical skills. Most of the time, all you need to do is copy and paste the code from the original website into your own. By doing so, you can integrate a wide range of multimedia content from different sources into your all-in-one platform. Students do not need to switch browser tabs, because the content is displayed and navigated right inside Teachfloor.
If you want to customize the content appearance, you may use CSS styles. However, this will require basic knowledge of coding.
How to Embed Content in 3 Steps
Embedding content on Teachfloor is straightforward. Here are three steps to do it.
- Login. To navigate the whole platform, make sure to log in first on Teachfloor. If you don’t have an account yet, sign up for a 15-day free trial. No credit card is required.
- Create a New Course. Once logged in, go to 'courses'. On the top right of the screen, click 'create a new course'. The platform will ask you to write down information about your course: course name, description, cover image, price, and so on. Save the course afterward. Once saved, you can start building your curriculum by adding elements and lessons.
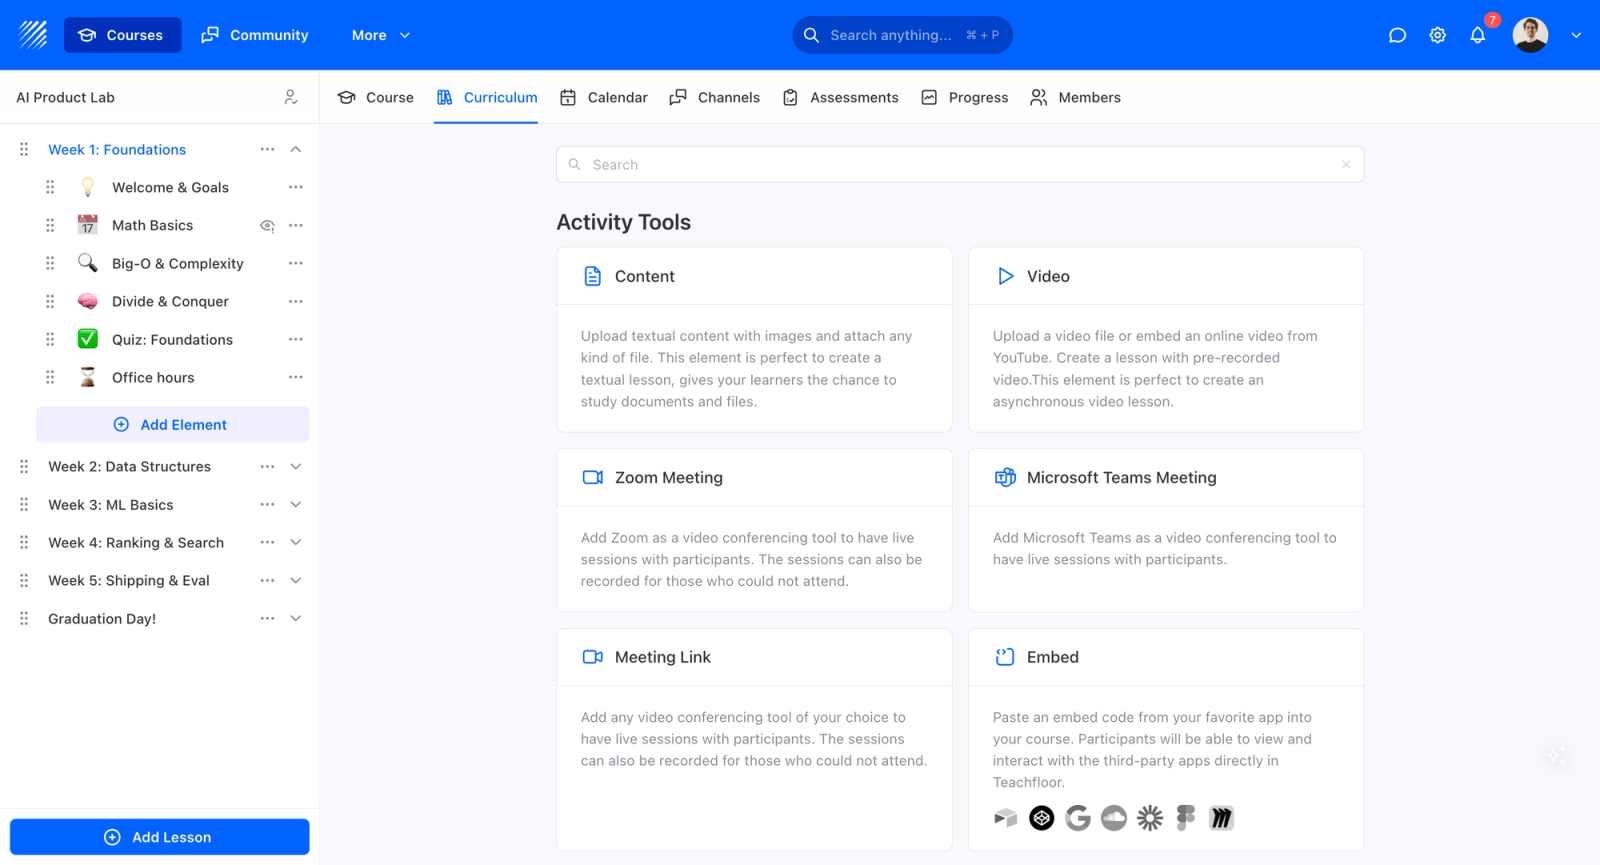
- Add Element & Embed Content. To test it out, click on ‘add element’. There are 11 elements to choose from in the platform. Choose and click ‘embed’. From there, you may now embed 100+ software apps and tools into your courses. Write the name of the element, its description, and additional resources. Copy-paste the code into the ‘embed setup’ box space. Remember to change the size of the code to height=800 width=100% for a better experience. Finally, save the element.
Whether you are creating self-paced courses, bootcamps, cohort-based courses, or mastermind groups, the embed feature is easy to use on Teachfloor's curriculum builder.
Because you can drop in tools from almost any category, an embedded lesson can be as hands-on as you want it to be.
Tools that you need to create an interactive online course
Building a space for students to work and learn together is a must-have in modern learning. Embedding these tools on Teachfloor gives students direct access to them. Creating courses also takes creativity, so we have listed the most popular and intuitive online tools to make your course more engaging, fun, and interactive.
We have added a brief explanation of why each tool is used and how it works, with video tutorials you can follow. As AI keeps advancing, some of these well-known tools have added AI capabilities, so it is worth trying them to speed up your work.
| Tool | Category | Use it for |
|---|---|---|
| Padlet, Miro, Whimsical | Brainstorming | Collaborative boards, mind maps, and live ideation |
| Google Slides, Pitch, Canva, Figma | Presentations & design | Visual lessons, decks, and design or UX work |
| Google Forms, Typeform | Quizzes & surveys | Assessments, polls, and student feedback |
| Quizlet | Gamification | Flashcards, games, and recall practice |
| Google Sheets, Airtable | Databases | Shared datasets and resource libraries |
| Google Docs, Notion, Coda | Collaboration | Co-edited docs, wikis, and project pages |
| Vimeo, Loom, YouTube | Video creation | Lesson videos and screen recordings |
| Spotify for Podcasters, SoundCloud | Podcast creation | Audio lessons and shared podcasts |
| Accredible | Certification | Digital badges and verifiable certificates |
Brainstorming
Instructors should create a collaborative space where students work together on a project that requires them to strategize, think, and build. Brainstorming tools are the best route for this activity. Here are some of the top tools for brainstorming sessions that you will want to add to your list.
Padlet
Padlet is a freemium and intuitive brainstorming tool that allows you to create beautiful boards to collect, organize, and present anything such as images, links, text, or videos. Just recently, it generates images for a more creative experience. If you want to try, click on the option ‘I can’t draw’, then write what you want to draw to generate the images you want. Use it like how you use Dall-E, a text-to-image generation tool.
How to embed Padlet on Teachfloor?
- Select the Padlet board that you want to embed.
- On the right side of your board, click the icon ‘Share’.
- Choose ‘embed on your blog or website’ to get the code.
- You can pick among these three: full embed, embedding on WordPress, or preview card embed.
- Click ‘copy’ of your choice.
- Paste it on the existing element on Teachfloor
Miro
Miro is one of the widely used white-boarding platforms that enables virtual classrooms to learn together in real-time. With this tool, online learners can create and share visual materials such as diagrams, mind maps, and flowcharts to enhance their learning experience, collaborate with peers, and brainstorm ideas.
Lately, Miro releases a new feature in Beta integrating AI into their product. Miro AI helps you to brainstorm ideas with AI by generating ideas in a matter of seconds. With this feature, you can also generate images, summarize the content on stickies, and remove an image’s background.
How to embed Miro board on Teachfloor?
- Once you are logged in, select the Miro board that you want to embed on Teachfloor.
- At the top right corner of your screen, click ‘Share’.
- Then click on ‘</> get embed code’ at the bottom of the pop-up.
- You have two choices—to embed the board with free navigation, or as a presentation. Don’t forget to change the size for an optimal experience. Once you have chosen your preferences, click the code or ‘copy embed code’. Remember to change the sharing settings of your board to give access to your students.
- After copying the code, paste it on Teachfloor.
Whimsical
Like Miro, Whimsical released a feature for automating ideation. It has a friendly interface with a wide range of customizable templates, from professional diagrams and workflows to mockups. You and your students can brainstorm and ideate faster with its suggestions. For more options, see our roundup of free online whiteboard tools for online teaching.
How to embed Whimsical?
If you’ve been using Whimsical, then embedding its code to your website is no different from before.
- After you logged in or signed up in Whimsical, go to your board and select the ‘Share’ icon on the top right side of your screen next to the ‘Search’ icon.
- Choose embed and click copy. Don’t forget to enable public access if you want to or crop the current viewpoint. You can experiment with the appearance through these settings.
- In Teachfloor’s platform, create an ‘embed’ element. Paste the code, and then save. Go to ‘Back to View’ and experience Whimsical on your platform.
Presentations
Despite being one of the oldest methods of creating visually engaging content, presentations never run out of their style. Back in the days when eLearning experts are using SCORM files to make their presentations beautiful and interactive, it now evolves into these well-known digital tools that you can embed on your website or on Teachfloor.
Google Slides
Google Slides is just one of Google’s Obra Maestra in creating free tools for everyone. I assume everyone knows what Google Slides is, but for a few people who don’t know—it’s a cloud-based presentation software where you can create, edit, and collaborate online with a variety of templates and themes.
It’s very intuitive and simple to use. Even a 5th grader would know how to use it. Since Google Slides is one of the most used tools of all time, let’s discover how you can embed the presentation you created into Teachfloor.
How to embed Google Slides into Teachfloor?
- After creating your slides, it’s to share them. Go to ‘File’ -> ’Share’ -> click ‘Publish to Web’.
- Choose “Embed”. Make sure you publish the slides and you change the settings according to your preferences.
- Then Google will automatically generate the code for you. Copy the entire code (Ctrl + A, then Ctrl + C).
- Lastly, go back to Teachfloor’s platform. Paste the code in the embed code box (Ctrl + V).
- Click Save and go to “Back to View” to see the entire slides inside your course.
Figma
Are you offering a design or a product online course? Teachfloor supports Figma so you can maneuver the tool inside the platform. Figma is a cloud-based design and prototyping tool used for user interface (UI) and user experience (UX) design. Designers need to collaborate more than ever. This tool makes it easy for them to work with teams and present their work to team members, clients, or instructors.
How to embed Figma board into Teachfloor?
If you are teaching design and product, this is how you can embed Figma into Teachfloor so your students can access or work on Figma directly on Teachfloor’s platform.
- After opening a Figma board, click on the ’Share’ button at the top right corner of your screen beside your user photo.
- Make sure to set up the preferences before clicking the ‘<> Get embed code’ on the bottom part of the pop-up.
- After setting up, go to Get Embed Code and click on ‘copy’.
- Switch your tab to Teachfloor, then paste the code (Ctrl + V). Hit ’save’!
Pitch
Like Google Slides, Pitch is also a cloud-based presentation software. The difference is that Pitch lets you create polished presentations in real time with your team. It has a large library of high-quality images and icons, both 3D and 2D, that you will enjoy. There is no need to book a separate Zoom call. You can discuss inside Pitch while you create a presentation together with your students.
How to embed Pitch presentations on Teachfloor?
- Log in to Pitch.com. After creating your amazing slides, click on ’Share’.
- Choose ‘Embed Presentation’. Enable/disable public access, then click on the copy icon.
- Paste the code into Teachfloor (Ctrl+V). For optimal experience, don’t forget to change the width to 800.
- Hit ’Save’! To see the live presentation, go to ‘back to view’ and play around with it directly.
Canva
Canva changes how we design branding materials forever! With Canva, everyone can produce their logos, posters, banners, and presentations just like a professional designer. It is a cloud-based graphic design platform that enables non-designers to customize the design using a library of templates, icons, and presentations. It’s intuitive so you don’t need to be an expert just to use it.
Recently, Canva launched its AI-powered features such as AI Images and AI Text generator. This evolution gives users a more personalized experience in designing using the Canva platform. As an instructor, you can generate text to images and ask Canva to write presentation copy for you! It saves you time by designing an interactive presentation in seconds.
How to embed Canva slides generated by AI on Teachfloor?
- Once you are logged in on Canva.com, try its magic presentation tool.
- Canva will ask you to describe your presentation topic in 3-5 words, so write it down. For example, social media strategy plan for 6 months.
- It will automatically generate slides that you can customize accordingly. Press on ’Create my presentation'
- Click ’Share’ at the top right corner of your screen, then choose ‘more...'
- Look for ‘<> Embed’ to get the code. As always, copy the code from Canva to paste it on Teachfloor. It would be better to copy the ‘HTML embed code’ for a better experience.
- That’s it! Go to Teachfloor and paste the code. Play around with it inside the platform.
Quizzes, Surveys, and Assessments
The most important part of creating courses is assessment. Surveys and quizzes are how you measure your students' learning progress, and student feedback tells you whether the lesson landed: Is it clear enough to understand? Are they keeping up with the pace? Teachfloor has flexible quiz and survey features for assessing your students. If you want to make it more interactive, you can use the following tools and embed them on Teachfloor in seconds. For deeper context, see our guide to eLearning authoring tools.
Google Forms
The same with Google Slides, Google Forms is part of the family of Google Workspace. It is a cloud-based platform that allows users to create simple surveys, quizzes, and forms for free. It is integrated with Google Sheets to collect and analyze form responses quickly. So if you want to ask your students for their feedback every after class, that’s possible to do on Teachfloor by embedding Google Forms on the modules.
How to embed Google Forms on Teachfloor?
Are you done creating your feedback form? If yes, then it’s about time to share it with your students using embed code.
- In the Google form edit view, click on ’Send’ and press on the ‘<>’ embed code icon.
- Don’t forget to change the width to 800, let alone the height. Then click ’copy’.
- Once you’ve copied the code, go back to Teachfloor and paste it into the embed box.
- Lastly, click ’Save’ and your students will now be able to answer the form directly on Teachfloor.
Typeform
If you think Google Forms are boring, then feel free to use Typeform. It is unique in its conversational approach to form design, where users can create forms that feel like a conversation with their audience. It also offers powerful analytics and reporting tools to help users gain insights from their form data. So if you’d like to create quizzes, polls, and surveys that form interactive conversation with your students, then use Typeform. Like other tools, you can embed this tool on Teachfloor.
How to embed Typeform on Teachfloor?
- Choose the form that you want to embed. Don’t forget to hit ‘Publish’.
- At the top center bar, click on ’Share’.
- On the left side of your screen, select ‘Embed in a web page’.
- Choose how you want it to look on your platform. Choose ’standard’ for Teachfloor.
- Click on ’Start Embedding’. In the pop-up, remember to select ‘general embeds’, then copy the code.
- Paste it on the platform and press ’Save’.
Gamification
Gamification is the best strategy to create engaging classes. It’s timeless and proven by successful courses and curriculums designed with gamification. Gamification works not just with kids, but also with adult learning. K-12 schools use this approach down to corporate L&D teams to establish highly engaging learning programs.
Quizlet
Memorization is boring. But not with Quizlet! Quizlet is a cloud-based platform that offers a variety of study tools, including flashcards, quizzes, and games, to help information stick into our brains. It is fancy in its community-driven approach, where users can share their study sets and collaborate with others. It also offers personalized learning features and progress tracking to help users achieve their learning goals.
As tech advances, Quizlet advances too. Now, the powerful tool launched ‘Q-Chat’ an AI tutor bot built with OpenAI API. As an instructor, you can leverage your teaching with this tutor-bot to answer students’ prompt inquiries. Another way to leverage this tool is to embed it on your learning platform. Teachfloor supports embedding this tool where your students can interact directly with the flashcards inside Teachfloor’s platform.
How to embed Quizlet on Teachfloor?
In Quizlet’s case, you don’t need an account to embed a quiz or a flashcard to any of your websites. Let’s try to embed this Artificial Intelligence quiz from Quizlet.
- Select the three dots (…) at the bottom part of the flashcard, then select ‘embed’.
- Don’t forget to select your preferred study mode. Do you want to embed a test, a match, or a flashcard? After choosing the study mode, click ‘copy HTML’.
- Then go back to the platform and paste it on the embed box. After saving, your students can now take the quiz in real-time inside Teachfloor.

Databases
In today’s world, we are flooded with content resources. Curating them for our students’ advantage is a must-have. So, database tools are needed much more than ever! Co-create databases with your students with these modern tools powered by great interfaces and automation.
Google Sheets
Here is some good news: Google Sheets can be embedded on Teachfloor. Google Sheets is also part of the Google Workspace family. It has wide-ranging capabilities for spreadsheets and databases. It offers strong data analysis tools and integrates with other Google services, such as Google Forms, to make data collection and analysis easy.
Google Sheets are widely used in Data Analytics courses for simple data analysis and data collection. If you are running a Data Analytics Bootcamp, you can embed Google Sheets on the modules so your students can access the spreadsheets directly without signing in to Google Workspace.
How to embed Google Sheets on Teachfloor?
- Same as Google Slides, after creating your spreadsheet, go to ‘File’ and then ’Share’ then ‘Publish to Web’.
- From there, you can set up what you want to show to your students. Is it the entire document or a tab?
- After setting it up, don’t forget to hit ‘Publish’, and then copy the code.
- Paste the code into your Teachfloor platform. Insert the width=100% and height=800 in the code before hitting 'Save'.
- Go to 'Back to View' to see if the code works. Your students are now able to access your spreadsheet.
Airtable
If you like to be fancy, then use Airtable. Unlike Google Sheets, Airtable allows you to create databases and turn them into pretty visual interfaces such as grid views and forms. Airtable is known for its flexibility and versatility. You can even customize workflows at the back end.
To capture your students’ attention, an eye-catching visual interface is needed. Embed Airtable on Teachfloor where they can access the knowledge library you created or co-created for them.
How to embed Airtable on Teachfloor?
- Login or Sign up at Airtable.com. After creating your database, go to ’Share View’ at the top menu of your screen.
- Then create a shareable link. Select ‘Embed this new on your site’. Airtable will bring you to another webpage where you will see how the content will look as an embedded code.
- Set up your preferences. Then click the code to copy.
- Once copied, go to the platform and paste it into the embed code box. Click ’Save’. You’ve made it!
Collaboration
Collaborative learning is a huge aspect of a successful online course. Using collaborative tools is one way to ensure that your course has a collaborative learning aspect. Thanks to these fantastic tools, collaboration is made easier in the online world.
Google Docs
If you’re using Google Docs, you can simply embed it on Teachfloor with no sweat. Google Docs is unique in its ability to support a wide range of file formats, including Microsoft Word and PDF files. It’s free for everyone to create and edit documents collaboratively in real time. With its powerful collaboration features, Google Docs enables teams to work together efficiently.
How to embed Google Docs into Teachfloor?
- After creating your document, like Google Sheets and Slides, go to File -> Share -> Publish to Web.
- Select ‘Embed’ and don’t forget to hit publish!
- Next, copy the code and paste it into Teachfloor. Don't forget to add the width = 100% and height = 800 in the code for an optimal experience.
Notion
Do you want more flexibility? Use Notion. It is one of the most popular apps that are used by product managers, founders, students, and course creators. It’s highly customizable, intuitive, and packed with powerful elements and features. You can use Notion as a resource bank, manage tasks, and projects, and as a database.
Although Notion is a powerful tool, you cannot embed it directly on Teachfloor or any other website. It doesn’t produce a code to embed in your site. Despite this reality, there’s another way to embed Notion on Teachfloor. It’s through another tool called Embed Notion. It generates the code so you can embed your Notion pages directly on any website. Let me guide you through.
How to embed Notion into Teachfloor?
- Login to a Notion account to create a page. Once you’ve created a page, click ’Share’ at the top right corner of your screen.
- Don’t forget to make your page public. However, if you want to make it private, make sure your students can access it by adding their email addresses through invites.
- Next, Login or Sign up to Embed Notion to convert your URL into an embed code. Embed Notion is a freemium tool. You may embed Notion for free for 30 days. Go to the premium plan if you don’t want it to expire.
- Once you’re logged in, copy your Notion public page URL into Embed Notion. Then click on Create Embed -> Go to Dashboard to get the code.
- Copy the code from your dashboard, then switch tabs to Teachfloor and paste it on the platform. Now you can collaborate smoothly with your students using the Notion app!
Coda
Coda is a great alternative to Notion. Similar to Notion, it has spreadsheets, databases, and project management tools. It stands out by its ability to support a wide range of use cases and integrate with other popular tools such as Slack, Trello, and Gmail.
The difference between Coda and Notion is that Coda can be embedded directly into Teachfloor. You don’t need a third-party app to embed its content as Coda generates its own embed code. Here are steps to follow so students can access your Coda pages in real time.
How to embed Coda into Teachfloor?
- Go to Coda.io to create your page. Feel free to use their templates to fasten your work.
- After that, click ’Share’ and then ‘Embed’. Don’t forget to turn your page into a public mode to give students access.
- In Embed, you can set up the page according to your preferences. You can even preview the embed.
- Once you have decided how it will look, copy the code and paste it on Teachfloor. Hit ’Save’. Congrats! Your students can now collaborate with you using the Coda tool!
Video Creation
Learning videos are a strategy that smart instructors use to create engaging lessons. In a world where videos, short or long, work across different learning methods, creating videos for your courses builds rapport with your students, captures attention, and offers a bit of edutainment. TikTok and YouTube, for example, have become learning hubs for people who prefer to learn through video.
If you have been creating videos for Youtube, you can use your Youtube videos as additional resources for your course. It’s possible to integrate into Teachfloor. On another note, you can create learning videos through some popular tools like Vimeo, Loom, and Invideo AI.
Vimeo
Vimeo is a video-sharing platform that provides high-quality video hosting and distribution services for individuals and businesses. It stands out by providing an intuitive interface where users can upload, manage, and share their videos with others. It also offers powerful analytics and engagement tools to help users understand how their videos are performing and engage with their audience.
You can upload or create your videos on Vimeo, then embed them into Teachfloor. There are two ways to do that.
How to embed Vimeo on Teachfloor?
- Log in with your Vimeo account. If you already created a video, then make sure to set it up first if you want to make it a public or private video. Private videos can only be accessed by you and the people on your account.
- Click on 'Embed' at the upper right corner of your screen. Choose if you want it to be responsive or fixed. Then copy the code
- Go to your Teachfloor platform, add an element, and paste the code on the embed code box.
- Hit 'Save' and go to 'Back to View' to watch videos inside the platform.
Loom
Do you want to show your students how you do certain tasks in real-time? Then use Loom. It is a video messaging platform that provides screen recording and video-sharing services. Users can record their screen, camera, or both, and share the resulting video with others. Audiences can react at different timestamps and leave comments on the web platform. They can save the videos on the cloud and share them through the generated link.
How to embed Loom on Teachfloor?
- Once you're logged in to your Loom account, you can choose the video you want to embed.
- Like Vimeo, look at the upper right corner of your screen and click 'Share'.
- Choose the 'embed' in the pop-up and choose whether you want to video to be responsive or fixed.
- After that, copy the code. Go back to Teachfloor to paste the code in the embed code box.
- Hit 'Save' and go to 'Back to View' to see if you embed it correctly.
Podcast Creation
Due to the rise of content creation, audio as a medium spiked up too! People listen to the podcast to be more productive while doing something at home, at the office, or during travel time. Podcasts are also a great way of learning. There are several great podcasts to learn from. Course creators adapted this style and so integrate it into their curriculum content.
Whether they create their own podcast or share one with their students, it is easy to access on Teachfloor through embedding. Here are practical tools to use for your podcast creation.
Spotify for Podcasters
Spotify for Podcasters (formerly Anchor.fm) is a free podcast hosting platform that simplifies podcasting with an intuitive interface and a range of tools. It lets you record and edit podcasts directly from your phone or computer, and it distributes straight to Spotify. It also offers analytics to help podcasters understand their audience and improve their content.
How to embed Spotify for Podcasters into Teachfloor?
- After creating a podcast (or searching for one), you can embed it directly into Teachfloor.
- Look for the 'Share' icon on the podcast show, then copy the embed code by pressing Ctrl+C.
- Go back to Teachfloor to paste your code. Don't forget to change the width to 100% and the height to 150px for an optimal experience.
- After that, hit 'Save'. Go to 'Back to View' to listen to your podcast.
Soundcloud
SoundCloud is a popular audio distribution platform that offers a vast collection of original music, podcasts, and other audio content. What is best about SoundCloud is its strong focus on promoting independent artists and creators, providing them with a platform to share their music and grow their fanbase. Users can upload their tracks, create playlists, and interact with their followers through comments and messages.
How to embed SoundCloud into Teachfloor?
Whether you create your own podcast on Soundcloud or you want to share one, both are possible to embed on Teachfloor.
- Look for the share button in the podcast you want to embed. Then click 'Embed' to generate the code.
- You can decide how you want the podcast to look on the platform. Feel free to play around and then copy the code.
- In the Teachfloor platform, paste it on the embed code box. Hit 'Save' and then you're ready to go!
Certification
Micro-credentials keep growing in importance. Employees are upskilling to keep pace with a changing workforce, and a certificate is a clear way to recognize that work. Offer certificates after your students complete your course. Teachfloor supports Accredible, so you can generate digital badges and certificates for your students.
Accredible
Accredible has an embed code feature allowing users to embed their digital credentials onto Teachfloor or LinkedIn profiles. The embedded credentials are highly-customizable to fit the user's branding and style. It also allows users to track how often their credentials are viewed and shared. Accredible's notable feature is its blockchain technology which ensures the authenticity and immutability of digital credentials.
You may embed Accredible credentials as example certificates and badges on Teachfloor. But the full use of Accredible is to help your students embed their credentials on their social media profiles and portfolio websites.
Embed the right tools on Teachfloor to bring out the best in your online courses
There are thousands of apps and tools to choose from to improve online teaching. Managing all of them is rarely easy when what you actually want is to create the best learning experience for your students. Increasing student engagement is hard enough on its own.
This is where Teachfloor's flexibility matters. You can embed 100+ external tools, whiteboards, slides, quizzes, docs, and video, directly inside your lessons, so a course becomes hands-on and interactive without your students ever leaving the platform. That combination of a real course creation platform and open embedding is what makes Teachfloor a strong choice for building interactive courses. By embedding these tools, you make it easy for every student to access, collaborate on, and navigate your content in one place. Sign up to start your 15-day trial.
PS. If you’re having a hard time creating a course using embed codes, our awesome team is here to help you! Book a demo with us and let's talk about your concern.